
Quick makeup looks for Halloween 2023
Spooky season is once again upon us, and you know what that means! It’s time for the ghouls and ghosts to roam, and a great excuse to flex our makeup looks. Still need some Halloween makeup inspiration? Here’s some quick looks to try out!
We REKKOmend:
Boxing Champ
This one is for the rough and tumble ones, complete with bruises and realistic looking scars!
Step 1: Use pink eyeshadow to dab on the outline of the bruise

Step 2: Apply yellow and green eyeshadow on the center of the bruise and purple, red and blue eyeshadow on the outer layer of the bruise

Step 3: Roughly blend, but ensure that the colours are not fully blended

Step 4: Use makeup wipes to wipe off the center of the bruise, trace the outline of the cleaned area and add yellow eyeshadow in the center. You can also look at special effect bruise makeup for inspiration on what a bruise should look like!

Step 5: Use a Q-tip or bobby pins and put red food dye/red face paint on the stem to mimic a cut

Step 6: Enhance the line by drawing around it

Step 7: Do the same thing on your eyebrows, or anywhere else you want!

Step 8: Apply a neutral lipstick, and voila!

Ghosts
Well, this isn’t your low-effort cloth-over-human type of ghost. We’re doing ghosts that haunt your eyes. That’s right, eyebags aren’t the only things haunting your eyes now!
Step 1: Apply light or neutral eyeshadow on eyes

Step 2: Draw a water droplet shape with white face paint

Step 3: Add some arms to the water droplets

Step 4: Use eyeliner to draw the ghosts’ eyes and mouth

Step 5: Draw short eyeliner

Step 6: Add glitter under and on the inner corner of your eyes

Step 7: Draw 2 more ghosts on your cheek

Step 8: Apply neutral lipstick or brown lipstick

Final look!

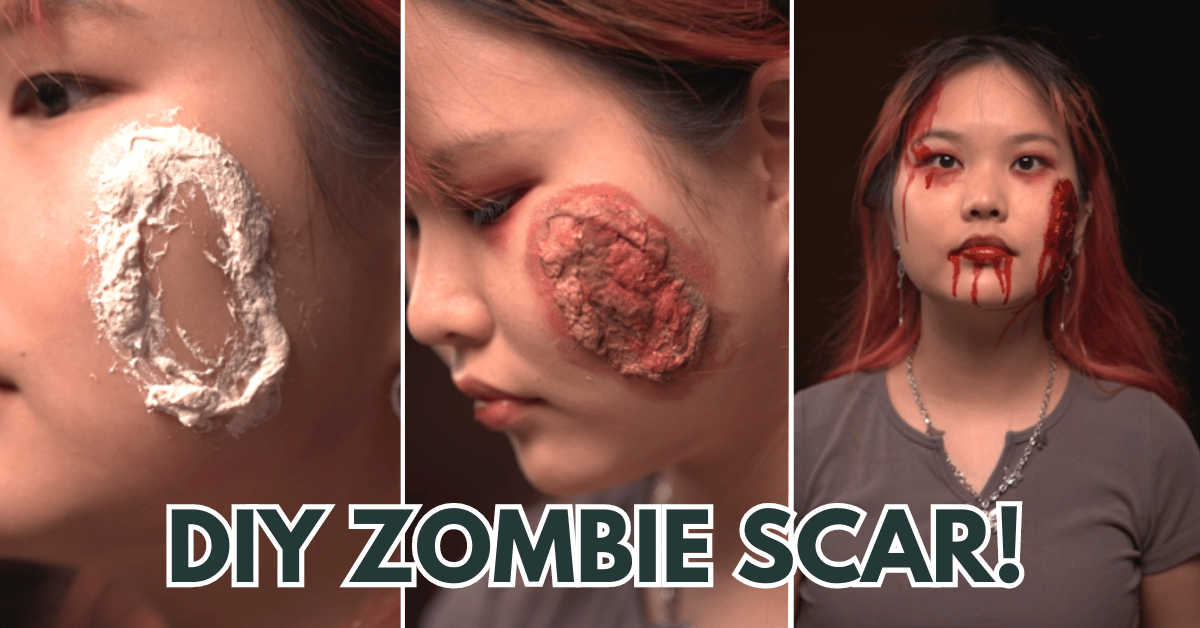
Zombie
Try as they might, the zombie genre never seems to die – must like the zombies themselves. This one will take a bit of effort, but we assure you its all worth it!
Step 1: Tear up a cotton pad and twist it up

Step 2: Place the cotton pads on your face, and apply liquid latex over them to create fake scar tissues

Step 3: The final shape and look of the liquid latex should look be an oval

Step 4: While waiting for the liquid latex to dry, apply purple eyeshadow on the top and bottom eyelids. Make sure to put a generous amount on your lower eyelids for maximum eyebag effect.

Step 5: After the liquid latex has dried, apply pink, red, and brown eyeshadow around the scar

Step 6: Apply more liquid latex and cotton pads in the center of the scar

Step 7: Apply red, brown and black eyeshadow around the scar. If it looks bad, it’s okay! Trust the process.

Step 8: Apply red food dye or red face paint over the scar. This might stain your clothes or surfaces so be careful!

Step 9: Mix the red food dye or red face paint with water for a gnarly dripping effect

Step 10: Apply more red to your forehead and lips

Final look!

Clown
Here’s a easy-to-do variation of the classic creepy clown look.
Step 1: Apply red eyeshadow

Step 2: Draw eyeliner

Step 3: Draw a triangle below your eyes and inner corner, and add a dot at the bottom

Step 4: Outline lips with black eyeliner

Step 5: Blend the outline with black eyeshadow

Step 6: Apply dark glossy lipstick to blend with the eyeshadow, creating an ombre effect

Step 7: Extend mouth with eyeliner

Step 8: Apply light blush on cheeks and heavy blush on nose

Final look!

Spiderweb
Get ready to spin some spook-tacular magic with our step-by-step guide to spiderweb-themed Halloween eye makeup!
Step 1: Draw eyeliner

Step 2: Draw 4 lines under your eyes

Step 3: Connect the lines with a curved lines to create a spiderweb design

Step 4: Apply dark eyeshadow

Step 5: Apply lip gloss

Step 6: Apply black eyeshadow over lip gloss. If you have black lipstick, you can use that instead!

Final look!
